Opening your washing machine door and being hit with a wall of musty, damp odor is one of the most common — and unpleasant — household problems. That smell almost always means one thing: mold. And in washing machines, mold doesn’t just affect the smell. Left unchecked, it transfers to your laundry, can trigger allergic reactions, and in severe cases, makes your machine a health hazard. The good news is that removing mold from a washing machine is something you can do yourself in an afternoon, without professional help. This guide covers exactly how to do it — including the most persistent cases.
For a broader look at complete washing machine maintenance beyond mold removal, see our complete guide to cleaning a washing machine.
Where Mold Grows in a Washing Machine
Mold is a type of fungus that requires three things to grow: moisture, warmth, and organic material (food). Washing machines provide all three in abundance. The most common mold hotspots are:
- Rubber door gasket (front-loaders): The #1 mold location. The folded rubber seal traps moisture, lint, hair, and detergent residue. It’s dark, warm, and perpetually damp — a perfect mold environment.
- Detergent and fabric softener drawer: Residue from liquid detergent and softener builds up in corners and crevices, providing food for mold. The drawer housing (the slot the drawer sits in) is even more prone to mold growth.
- Inside the drum: The drum itself can develop mold colonies on the drum walls and in the spaces between drum holes, especially when the door or lid is left closed between washes.
- Drum baffles: The plastic fins inside the drum have small gaps at their attachment points that collect moisture and residue.
- Drain filter and filter housing: Standing water in a clogged filter creates conditions for mold and bacterial growth that can produce strong odors.
- Detergent dispenser housing: The slot that the drawer slides into. Often completely neglected, this area can develop significant mold growth.
Is Washing Machine Mold Dangerous?
The mold typically found in washing machines is most commonly Aspergillus, Penicillium, and Cladosporium species — the same mold types found in bathrooms and basements. For healthy adults, brief exposure is generally not harmful. However:
- People with mold allergies may experience sneezing, runny nose, or skin irritation from mold-contaminated laundry
- People with asthma may have respiratory reactions to airborne mold spores released when the washer door is opened
- Mold on clothing can cause skin irritation or rashes, especially in people with sensitive skin
- A 2019 study identified drug-resistant bacteria (Klebsiella oxytoca) in washing machine seals, highlighting that the health implications can go beyond just mold
Bottom line: if you have mold in your washing machine, remove it promptly — especially if anyone in the household has respiratory conditions or allergies.
What You Need for Mold Removal
- Rubber gloves (essential — mold spores irritate skin)
- Safety glasses or goggles (recommended for severe mold)
- Old clothes you don’t mind staining
- White distilled vinegar
- Liquid chlorine bleach (most effective for mold)
- Baking soda
- Old toothbrush or small stiff-bristled scrub brush
- Microfiber cloths (3–4)
- Spray bottle
How to Remove Mold from a Washing Machine: Step by Step
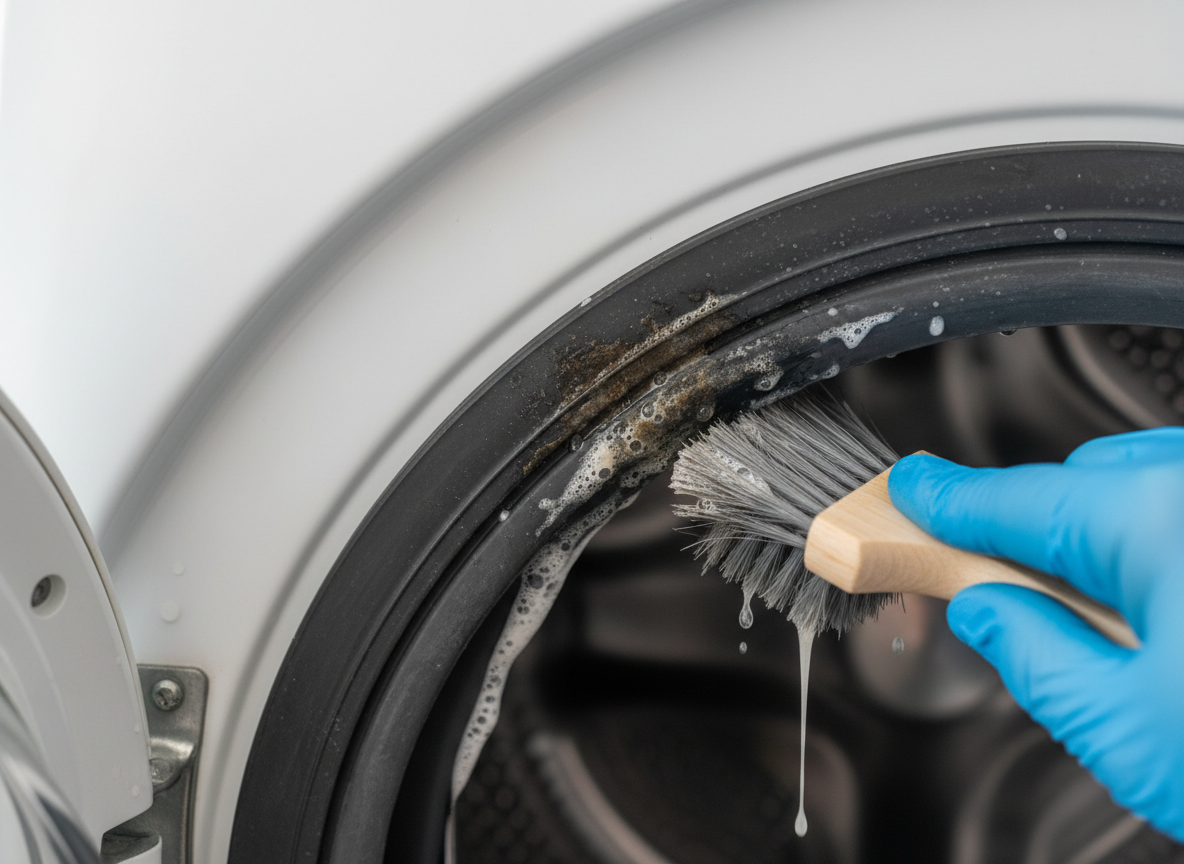
Step 1: Clean the Door Gasket (Front-Loaders)
For front-loading machines, start here. The gasket is almost always the primary mold location.
- Put on rubber gloves and eye protection if mold is severe.
- Open the door and carefully peel back the rubber gasket folds to expose the interior. Work your way around the entire gasket.
- Remove any debris — hair, lint, coins, small items — by hand.
- Assess the mold severity:
- Light mold (grey or pink residue): Undiluted white vinegar on a toothbrush
- Heavy mold (black spots, large colonies): Bleach solution (1 tablespoon bleach in 1 quart/litre of water)
- Apply your chosen solution generously to the gasket using a cloth or toothbrush.
- For bleach: let the solution sit on the mold for 5–10 minutes before scrubbing. This contact time is critical — wiping immediately is far less effective.
- Scrub every fold and crevice thoroughly with the toothbrush.
- Wipe away all loosened mold and solution with a damp microfiber cloth.
- Rinse the gasket by wiping with a clean damp cloth (no bleach residue should remain).
- Dry the entire gasket with a dry cloth.
Important: Never mix bleach and vinegar. They react to produce toxic chlorine gas. Use one or the other — not both in the same cleaning session unless you’ve thoroughly rinsed and dried between applications.
Step 2: Clean the Detergent Drawer and Housing
- Remove the detergent drawer completely (press the release tab if present).
- Hold it up to the light — look for black or grey spots in corners and the fabric softener section.
- Soak the drawer in a solution of hot water and white vinegar (1:1 ratio) for 20 minutes.
- Scrub all surfaces, including the bottom of the drawer where mold is most concentrated, with a toothbrush.
- For stubborn black mold on the drawer: apply undiluted bleach with a toothbrush, let sit 5 minutes, scrub, and rinse thoroughly.
- Rinse the drawer under running water until completely clean.
- While the drawer is out, look into the drawer housing with a torch. Wipe the interior of the housing — top, bottom, sides — with a bleach-dampened cloth or vinegar-dampened cloth. This area almost always has more mold than the drawer itself.
- Allow the housing to air out for a few minutes before reinserting the drawer.
Step 3: Run a Mold-Kill Cleaning Cycle
After cleaning the gasket and drawer manually, run a full hot cleaning cycle to kill any remaining mold inside the drum, internal hoses, and pump:
- Make sure the drum is completely empty.
- For maximum mold-killing effectiveness: add 1 cup of liquid chlorine bleach directly into the drum (not the detergent dispenser).
- Select the hottest available cycle — “Sanitize,” “Drum Clean,” or the hottest temperature + longest duration your machine offers.
- Run the complete cycle.
- Run an additional rinse cycle to thoroughly flush out bleach residue.
- For a follow-up deodorizing cycle: add ½ cup of baking soda directly to the drum and run a short hot cycle (do this after the bleach cycle and the rinse — never at the same time as bleach).
Step 4: Clean the Drum Filter (Front-Loaders)
A dirty or clogged drain filter creates standing water that becomes a mold and bacteria incubator. If your machine has been moldy, the filter almost certainly needs cleaning too. For the full step-by-step filter cleaning guide, see our dedicated article on how to clean a washing machine filter.
Step 5: Wipe Down the Drum Interior
- After the cleaning cycle, inspect the drum walls, drum holes, and the drum baffles (the fins that help tumble clothes).
- If you see any residue or discoloration, wipe down with a cloth dampened in white vinegar.
- For mold visible in the gaps at the base of drum baffles: apply a small amount of bleach solution with a toothbrush, scrub, and wipe clean.
- Leave the door wide open for 2–4 hours after cleaning to allow complete drying.
When to Replace the Door Gasket
In severe cases, mold penetrates deep into the rubber material of the gasket itself — beyond the surface where bleach can reach. Signs that the gasket needs replacement rather than cleaning:
- Black staining that remains after thorough bleach treatment and scrubbing
- The rubber feels soft, spongy, or crumbling in places
- Visible cracks or tears in the rubber
- Persistent odor that doesn’t improve even after multiple cleaning cycles
Replacement gaskets are available for most major brands and can usually be installed by a confident DIYer. Search for your machine’s model number plus “door gasket” to find the correct part. If in doubt, a washing machine repair technician can replace it quickly.
Preventing Mold from Coming Back
Removing mold is the easy part. Keeping it from returning requires changing a few habits:
- Leave the door open after every wash. This is the single most effective prevention measure. Even a few inches of opening allows moisture to evaporate. For front-loaders, prop the door ajar after every single cycle.
- Wipe the gasket dry after every front-loader wash cycle — takes 10 seconds and prevents most gasket mold.
- Remove laundry immediately when the cycle finishes. Wet clothes sitting in a sealed drum create ideal mold conditions within hours.
- Use the correct detergent type and dose. HE detergent for HE machines. Never more than the minimum recommended dose — excess detergent is mold’s food source.
- Run a hot cycle at least once a week. 60°C (140°F) kills bacteria and mold spores that survive cold washes.
- Monthly cleaning cycle. Consistent maintenance is far easier than periodic intensive mold removal.
For a complete natural cleaning approach that prevents mold buildup, see our guide on how to clean a washing machine with vinegar and baking soda.
Frequently Asked Questions
Does vinegar kill mold in a washing machine?
White distilled vinegar kills approximately 82% of mold species, according to the EPA, and is effective for light to moderate mold in washing machines. For surface mold on the gasket or drawer, apply undiluted vinegar and let it sit for 10–15 minutes before scrubbing. For heavy mold infestations or black mold, liquid chlorine bleach is significantly more effective. Never use both in the same cleaning session.
How do I know if my washing machine has mold?
The most obvious sign is a musty, damp, or sour smell when you open the door. Visual signs include black, grey, or pink spots on the rubber door gasket (the most common location), dark residue in the detergent drawer or its housing, or discoloration on the drum walls. If your clean laundry smells musty after washing, mold in the machine is almost certainly the cause.
How do I prevent mold in my front-loading washing machine?
Three habits eliminate most front-loader mold: leaving the door open after every wash (allows moisture to evaporate), wiping the rubber gasket dry after each cycle, and running a monthly hot drum-clean cycle with vinegar or a cleaning tablet. Using HE detergent and measuring doses correctly (no excess) also dramatically reduces residue that feeds mold.
Can I use bleach on the rubber door gasket?
Yes, a diluted bleach solution (1 tablespoon per quart of water) is safe for the rubber door gasket and highly effective at killing mold. Apply it, let it sit for 5–10 minutes for maximum contact time, scrub, then rinse thoroughly. Avoid using undiluted bleach directly on rubber regularly, as repeated strong bleach exposure can degrade the rubber over time. After bleach treatment, leave the door open and allow the gasket to air dry completely.
Conclusion
Mold in a washing machine is common, but it’s not permanent. With a thorough clean of the gasket, detergent drawer, and drum — plus a hot sanitizing cycle — you can eliminate even significant mold infestations. The key is preventing recurrence: leave the door open after every wash, use the right detergent in the right amount, and do a maintenance cleaning cycle every month.
For a complete step-by-step cleaning plan covering every component of your washing machine, see our comprehensive guide: How to Clean a Washing Machine: The Complete Step-by-Step Guide.
Leave a Reply